In my previous blog post, I introduced Selenium tools. In this post, I will build upon what I have shared and guide you on how to set up the environment and necessary tools to use Selenium with Java on the Windows operating system. I will go through the five steps used to set up Selenium tools. From my experience at zen8labs, I have designed it this way to give you the smoothest guidance when you’re setting up your Selenium, with the aim that you can build a successful Selenium environment.
1. Install JDK
First, visit the JDK download page and select the JDK download.
Choose the appropriate JDK version; here, I am installing it on Windows.
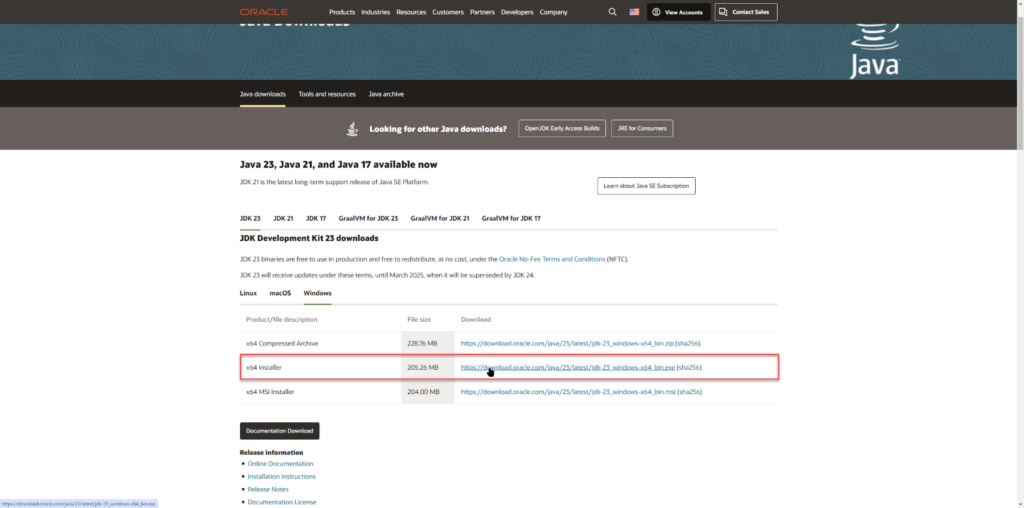
After the download is complete, open the file and proceed with the installation.
Click [Next] to start.
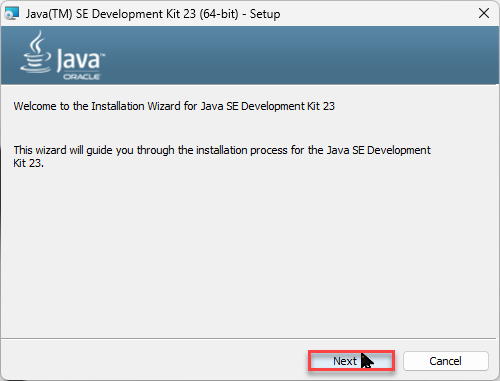
Then select the installation directory and click [Next].
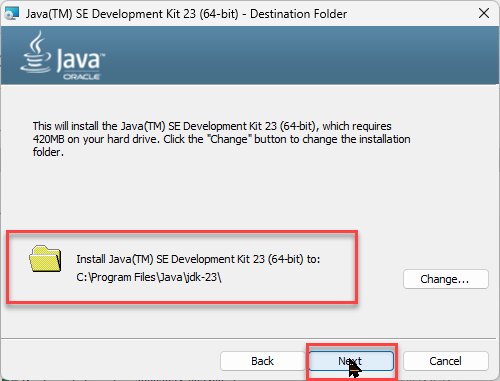
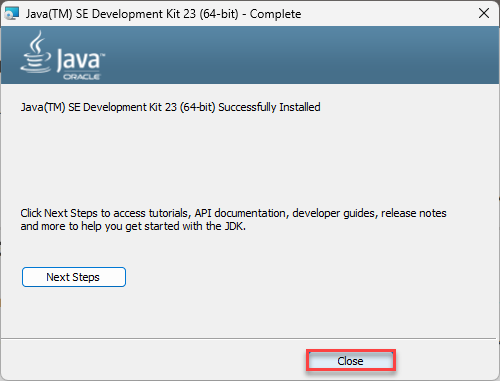
Click Close the popup.
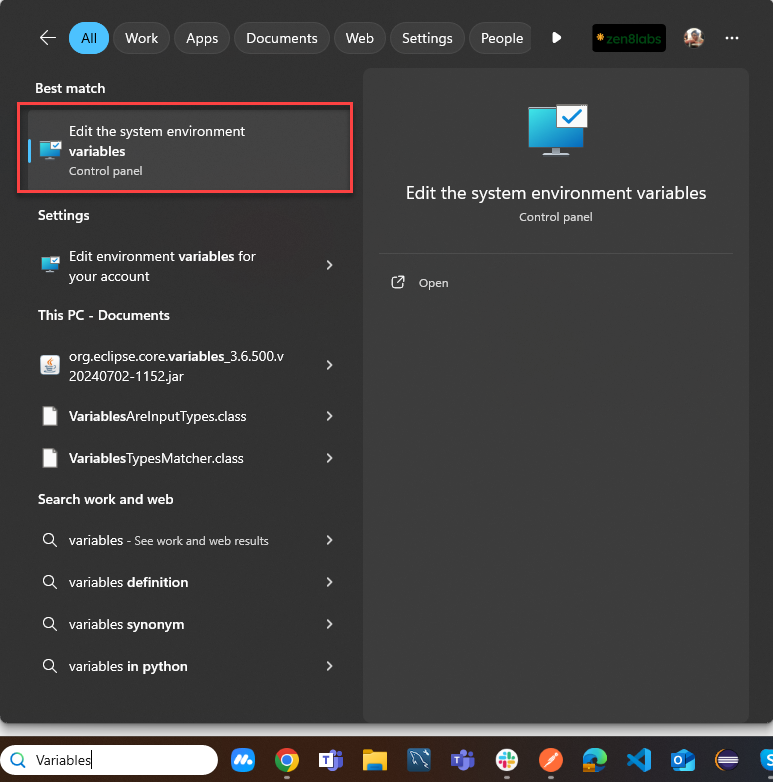
After this, we need to configure the environment variables on Windows. Search for “Variables,” then click on the menu “Edit the system environment variables.”
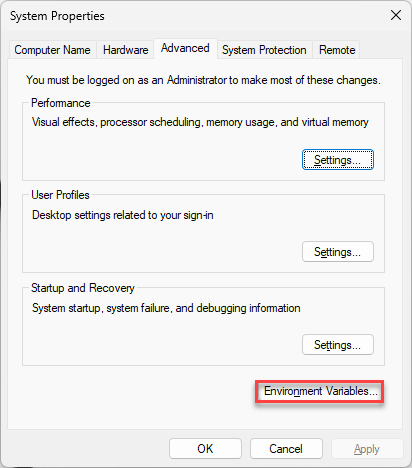
Then, click the “Environment Variables” button
Click the “New” button in [System Variables]
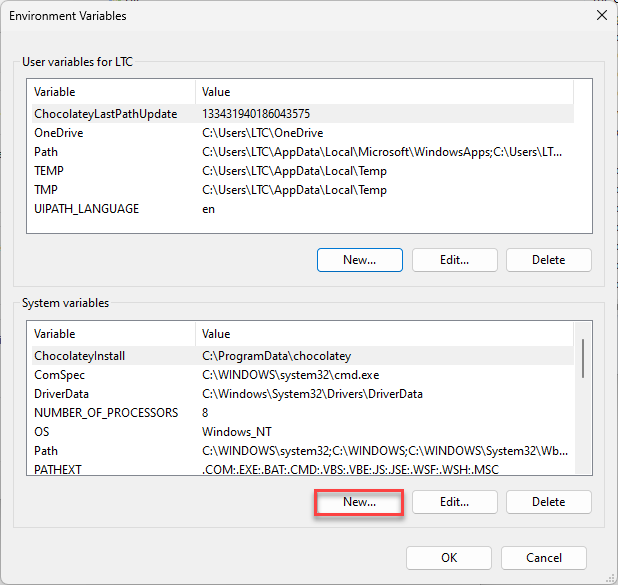
Enter: [Variable name] = “JAVA_HOME” (required) and [Variable value] = [java-path]. Make sure to check where your JDK is located and select the correct path. Click [OK]

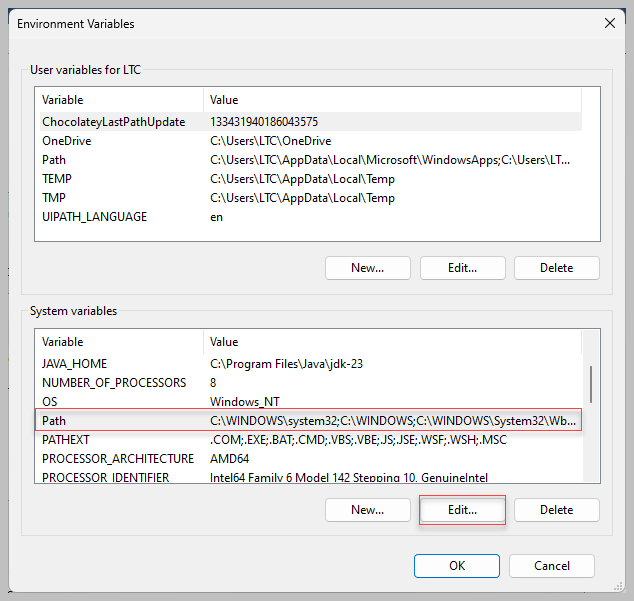
Select [Path] in [System Variables], then click the Edit button (or double-click on the Path line).
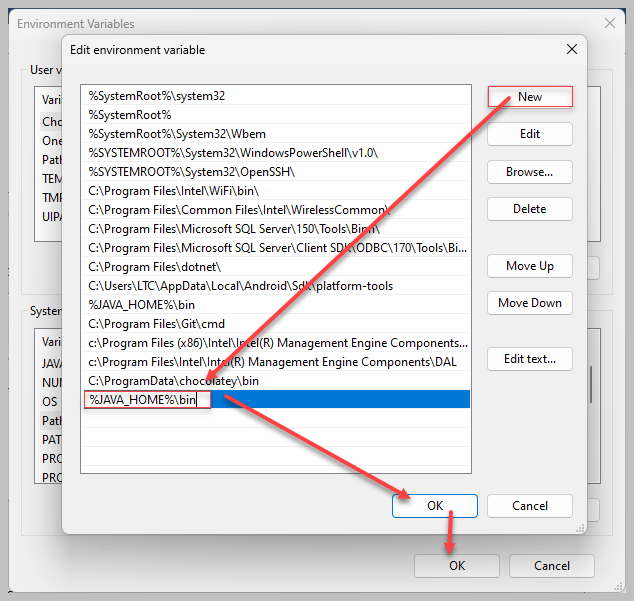
Select [New] in the [Edit Environment Variable] dialog. Enter the following value at the end of the Path variable:
%JAVA_HOME%\bin Click the [OK]-> [OK] -> [OK] to finish (clicking 3 OKs for the 3 dialogs).
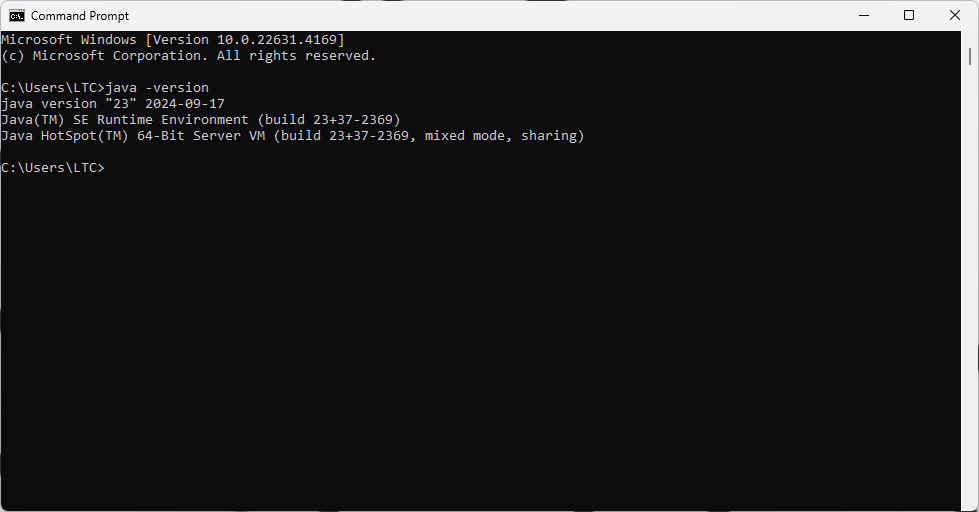
Here, we will check to see if the environment variable has been successfully set and if the computer recognizes the JDK value by doing the following:
- Open CMD and enter the command:
java -versionIf the installation is successful, the result will return the correct JDK version that you installed.
Next, we will move into the stage where we install the IDE.
2. Install the IDE
Now, I shall guide you on how to install Eclipse.
You can download the latest version of Eclipse at the following link: https://www.eclipse.org/downloads/packages/
You should download the “Eclipse IDE for Java EE Developers” version as it is designed for Java application development and Java J2EE applications. Download the 32-bit or 64-bit version depending on your operating system.
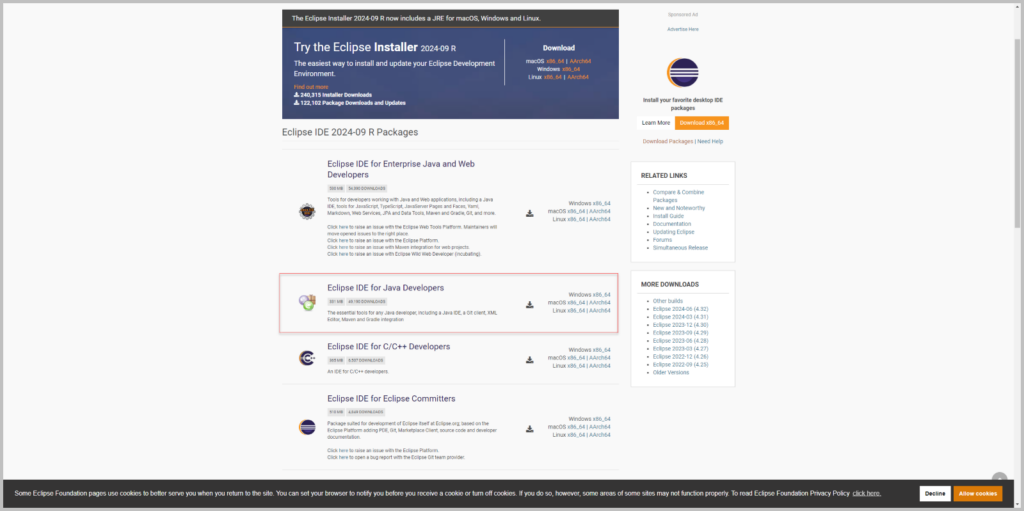
After downloading Eclipse, extract it and open it by double-clicking the eclipse.exe file.
You must select a workspace (the location where the projects you create with Eclipse will be stored – Folder) for Eclipse. Alternatively, you can check [Use this as the default and do not ask again] to set that workspace as the default and prevent the dialog from appearing the next time you open Eclipse.
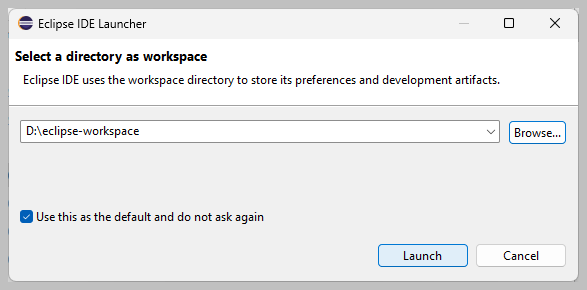
Select the [Launch] button
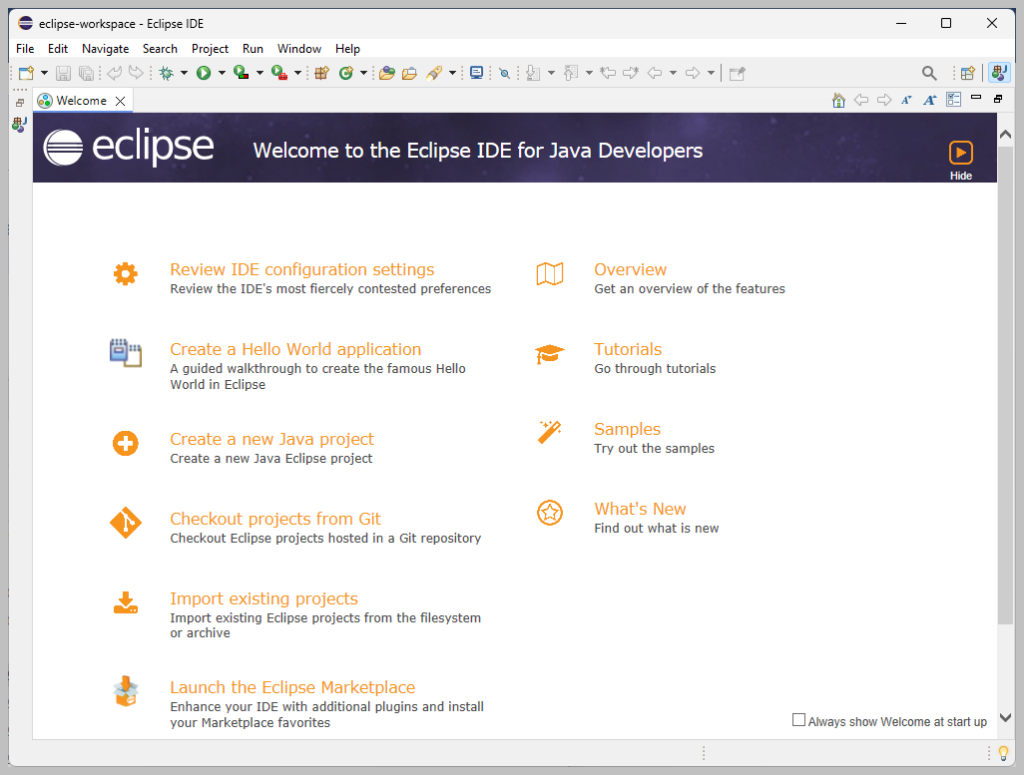
Close the “Welcome” tab, and we will see the interface as shown in this image:
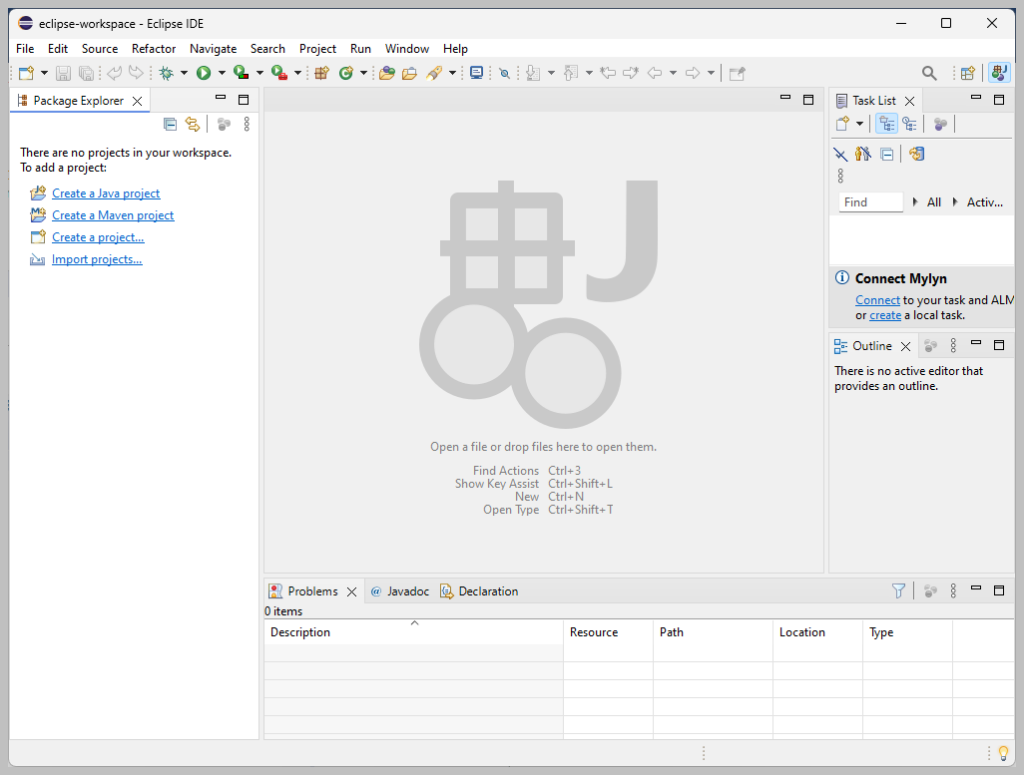
So, we have completed the installation of Eclipse IDE for Java programming. We shall now turn our attention, as we try to run a simple program on Eclipse.
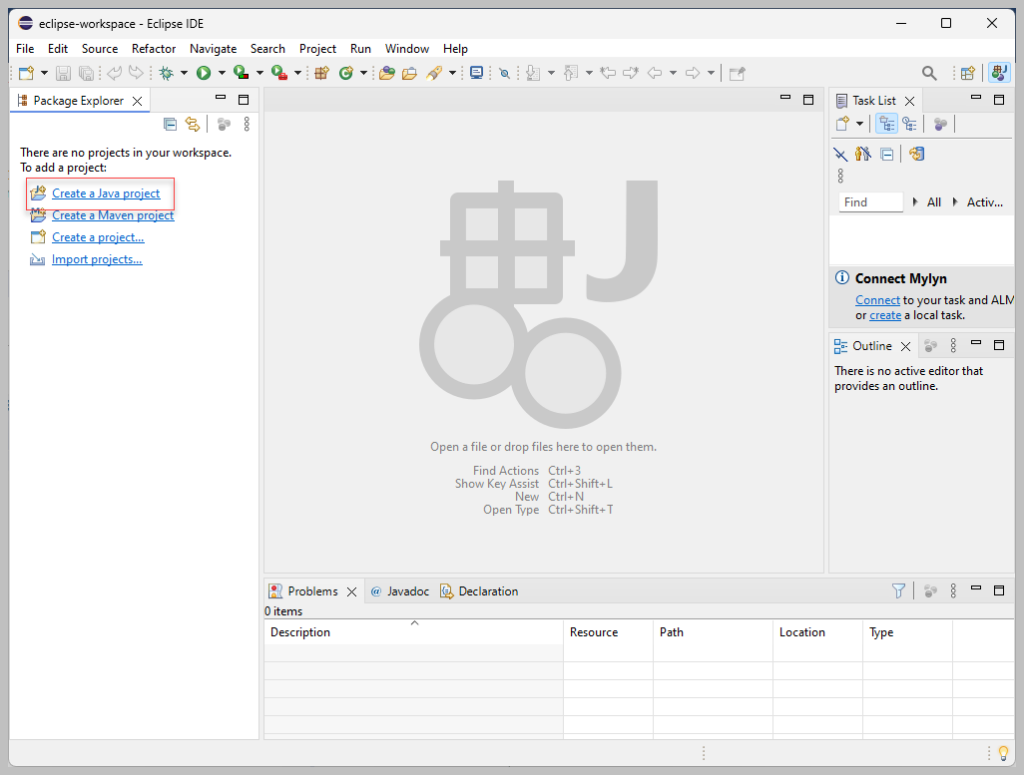
First, we need to add a new project. Click on “New a Java project.”
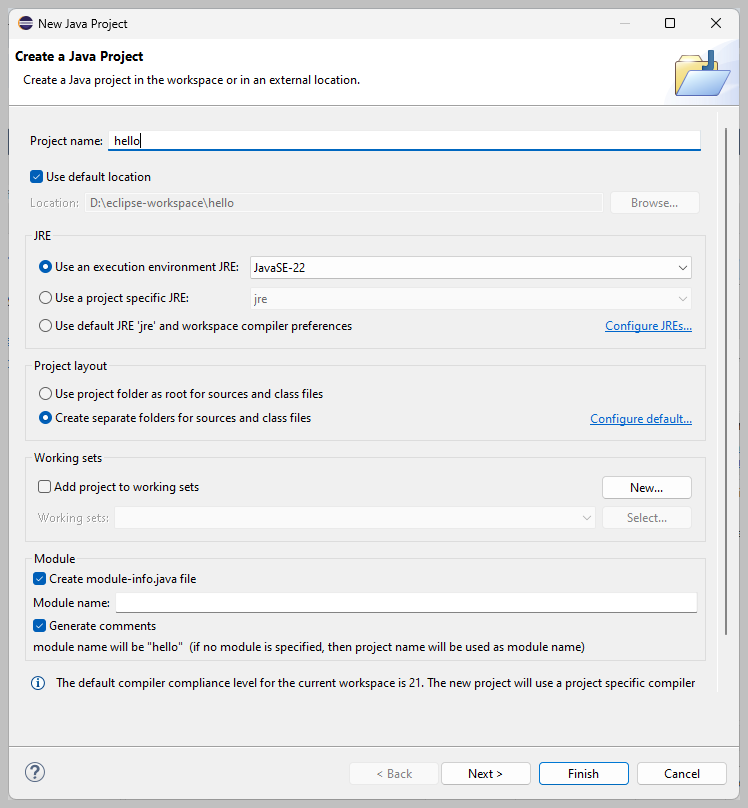
Enter the name and any other information if there are changes, then click [Finish]
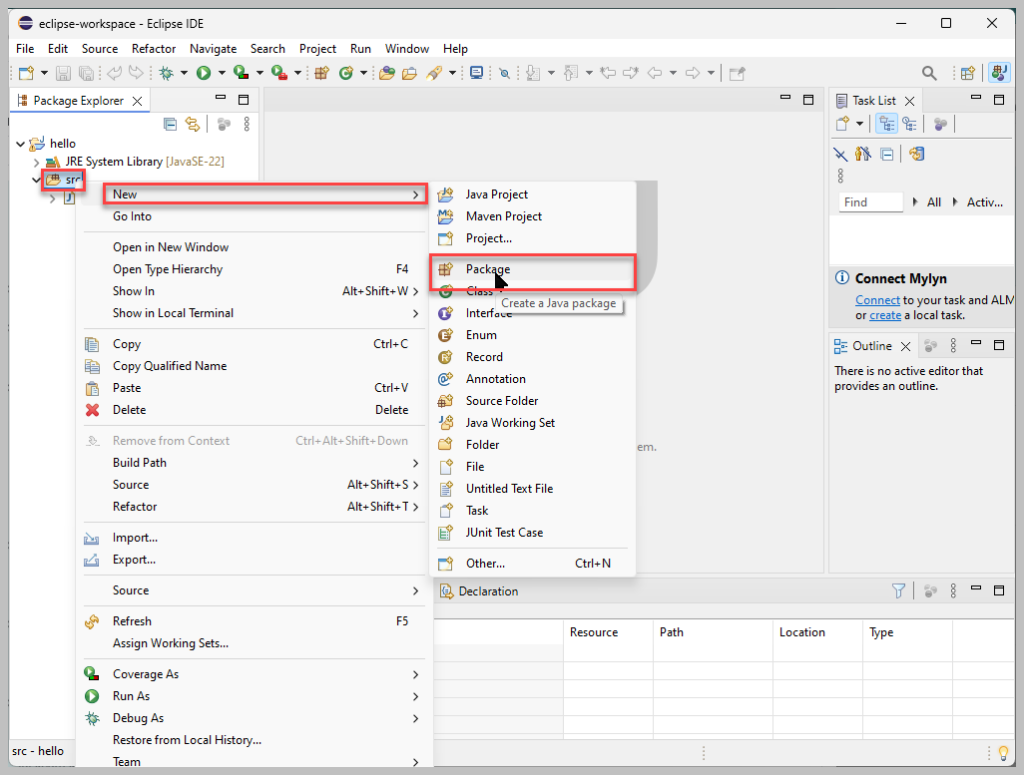
Create a package for the project: right-click on “src” -> New -> Package.
Enter the package name.
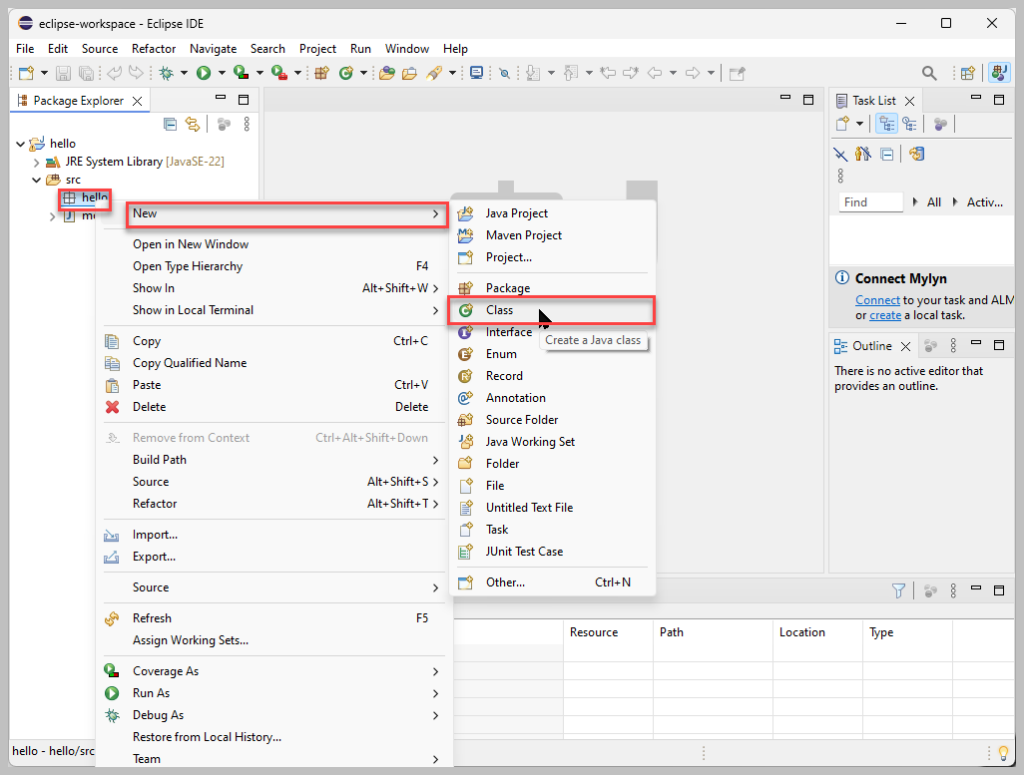
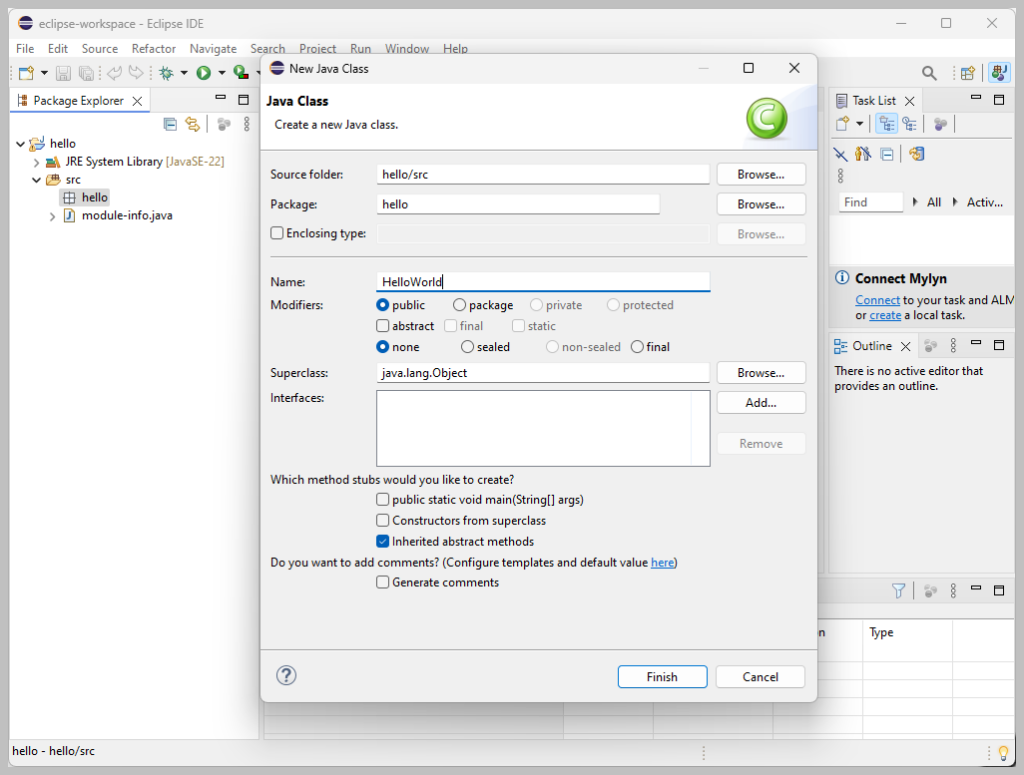
After that, right-click on the package -> New -> Class
Enter the information for the class.
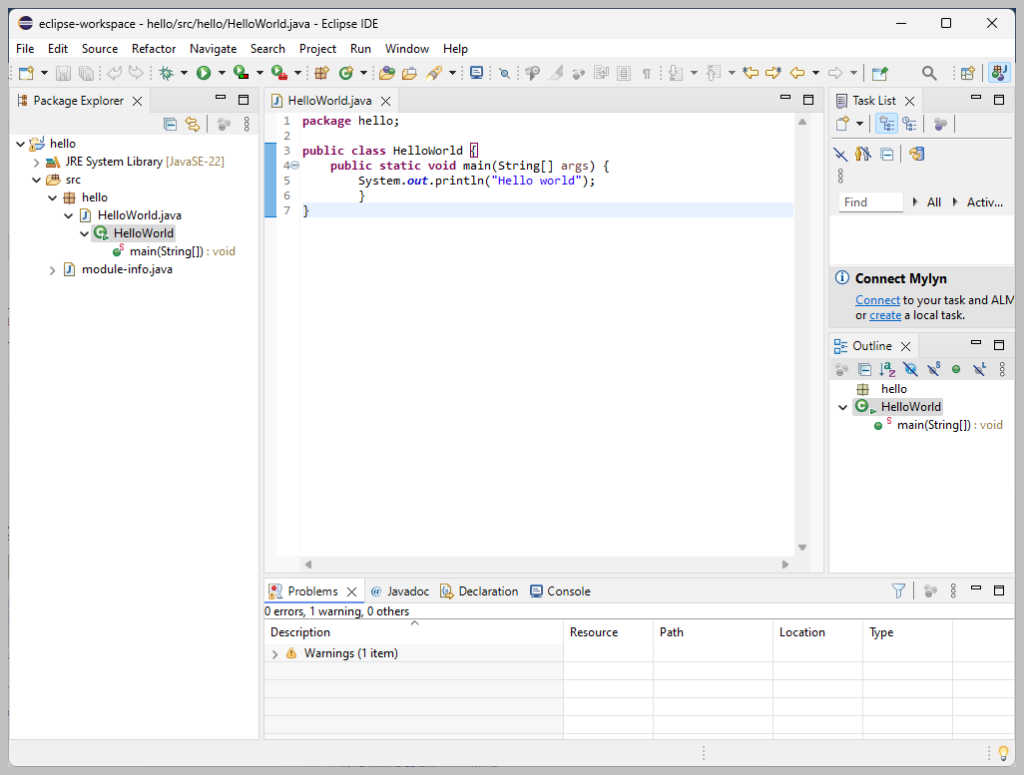
Write the main function to print “Hello, World.”
public static void main(String[] args) {
                 System.out.println("Hello world");
} 
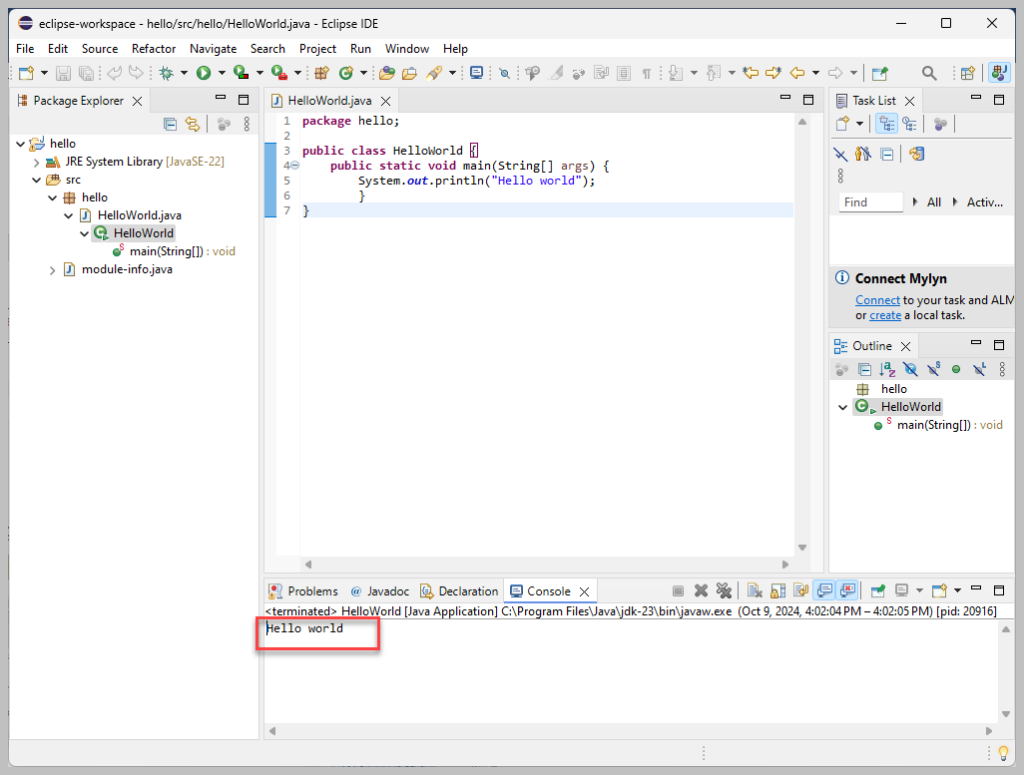
Click Run to execute the program, and we will see the result displayed as shown in the image:
3. Download Chrome for testing and chrome driver
Access the link: https://googlechromelabs.github.io/chrome-for-testing/
Select the corresponding version and WebDriver. For this example, I decided to go with the Stable version for Win64:
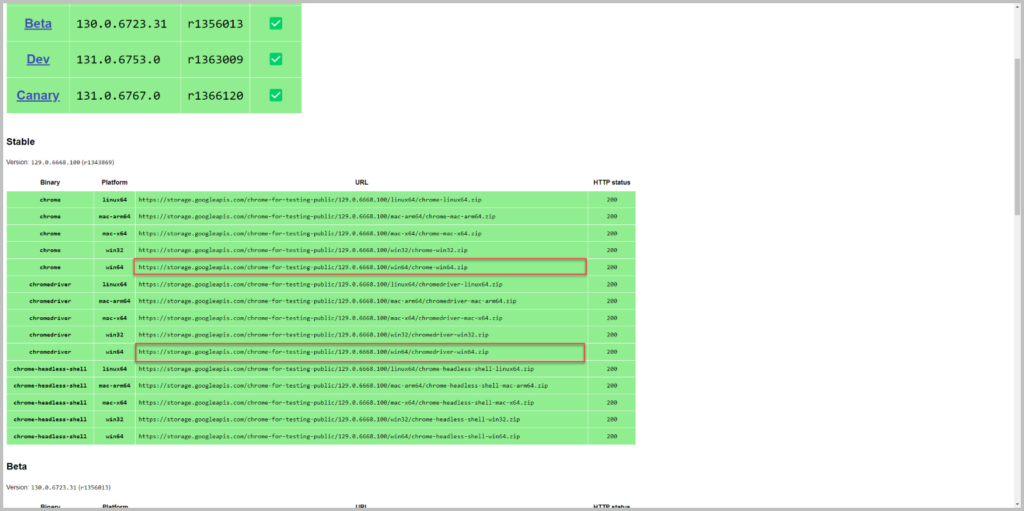
After downloading, proceed to extract it and make sure to note its path, as we need to setProperty chrome WebDriver
4. Add Selenium WebDriver to the project.
Download Selenium WebDriver from the link: https://www.selenium.dev/downloads/
Please select the version for Java.
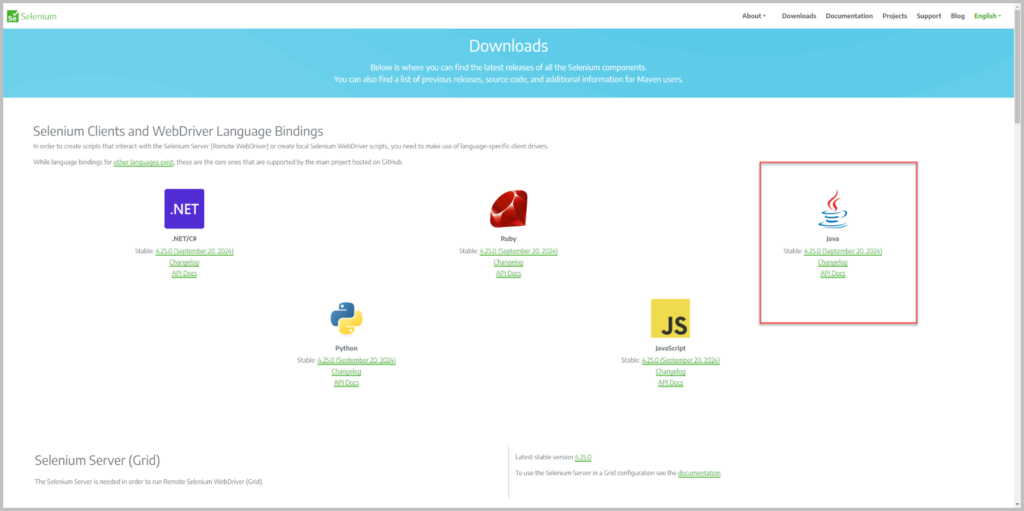
Then, open Eclipse and select the project you want to use or create a new project.
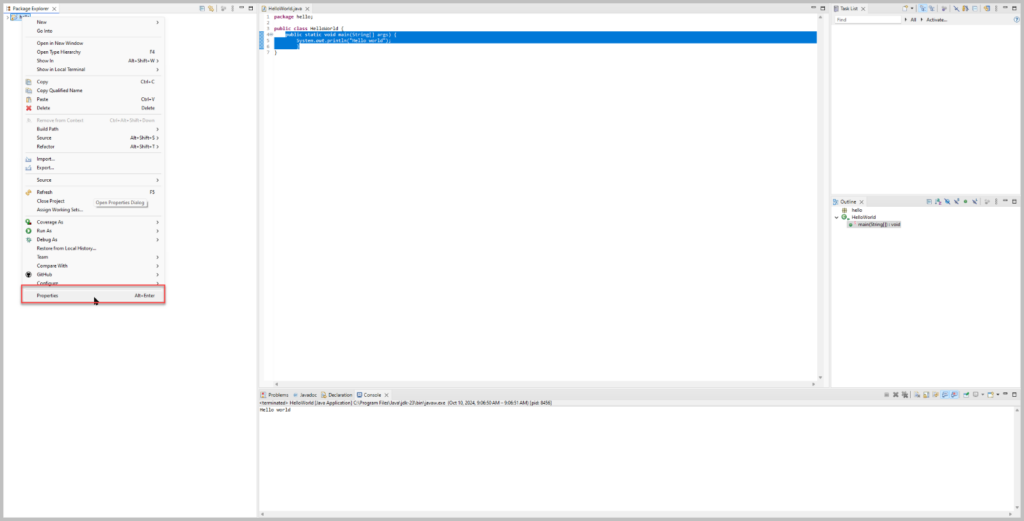
Right-click on the project, then select [Properties]
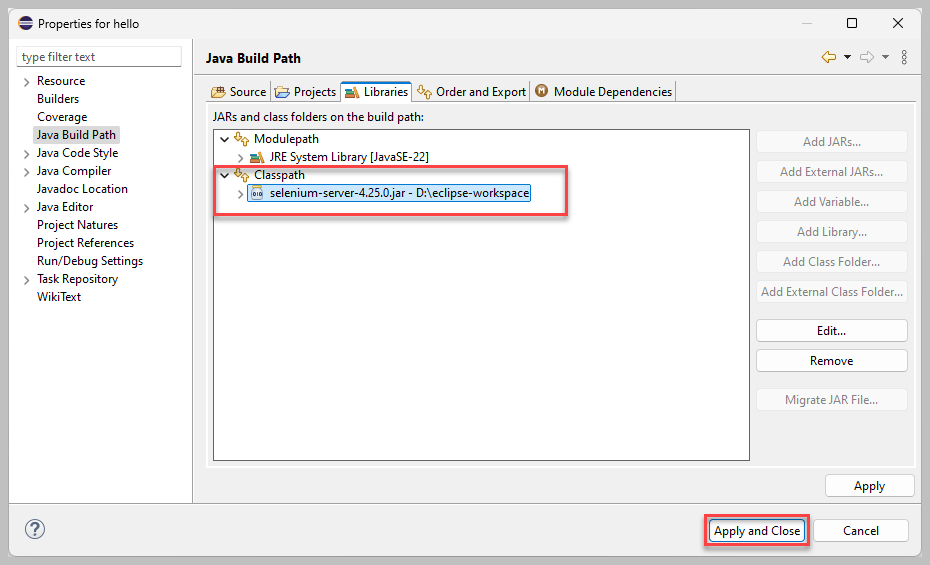
Select Java Build Path => Libraries => click on Classpath => Add External JAR => Browse to the JAR file you downloaded earlier.
After adding it, the file will be displayed in the [Referenced Libraries]
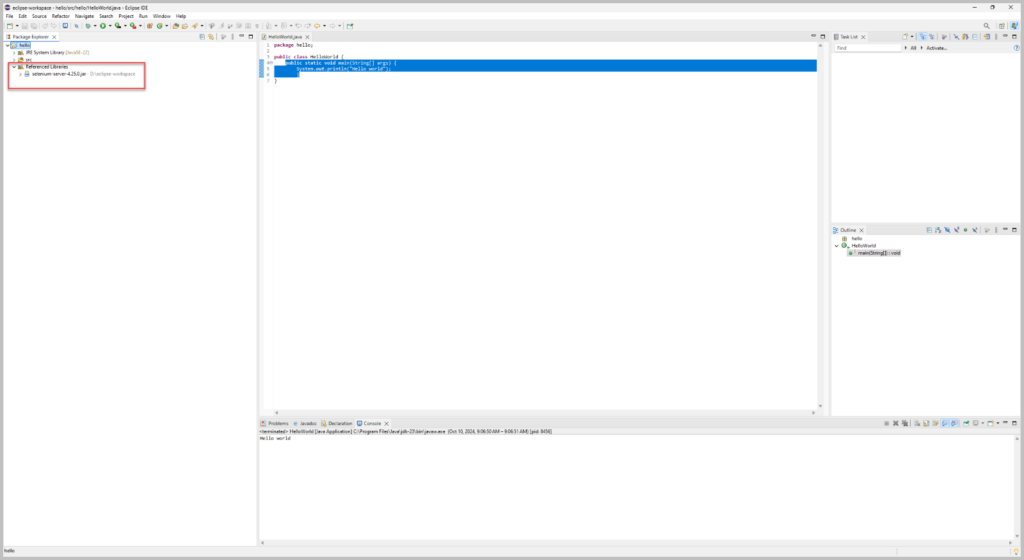
The set-up is going well now if we have the WebDriver’s successfully added to the project.
5. Example of automation code.
Create a new class
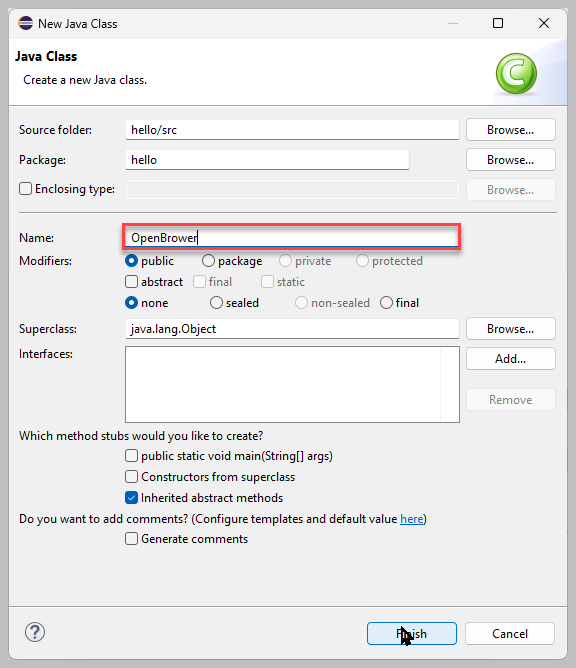
Next, Selenium WebDriver needs to know where your executable file is located, as mentioned in the previous post, we need chromedriver.exe to run the Chrome browser.
We accomplish this by using the command: System.setProperty().
This is a keyword you need to remember: “webdriver.chrome.driver.”
System.setProperty("webdriver.chrome.driver", "D:\\eclipse-workspace\\chromedriver-win64\\chromedriver.exe");In here “D:\\eclipse-workspace\\chromedriver-win64\\chromedriver.exe” is the path to the ChromeDriver.
Then, initialize the instance variable for the driver. If you want to use incognito mode, add the following code:
ChromeOptions options = new ChromeOptions();

      options.addArguments("--incognito");

WebDriver driver = new ChromeDriver(options);Note: “driver” is the variable name; you can choose any name as long as it follows the rules.
Thus, we have a code snippet
package hello;

import org.openqa.selenium.WebDriver;
import org.openqa.selenium.chrome.ChromeDriver;
import org.openqa.selenium.chrome.ChromeOptions;

public class OpenBrower {
       WebDriver driver;

       public static void Open() {
              System.setProperty("webdriver.chrome.driver", "D:\\eclipse-workspace\\chromedriver-win64\\chromedriver.exe");
              ChromeOptions options = new ChromeOptions();
              options.addArguments("--incognito");
              WebDriver driver = new ChromeDriver(options);
      }
}
To access a web link, we use the syntax:
driver.get("http://teststore.automationtesting.co.uk/"); In this case, http://teststore.automationtesting.co.uk/ is the web link we want to access.
Next, we will attempt to log in to this website. Add the following code:
Thread.sleep(1500);
             // Open Full size
 		       driver.manage().window().maximize();
            // go to signin page
 		       WebElement signin = driver.findElement(By.xpath("//*[@id=\"_desktop_user_info\"]/div/a/span"));
 			                                      signin.click();
           // Delay 0.5s loading
 		       Thread.sleep(500);
          // enter an account that has been registered on the website beforehand.
 		       WebElement acc= driver.findElement(By.name("email"));
 			acc.sendKeys("autotest@gmail.com");
          // enter The password for the account registered on the website previously.
 		       WebElement pwd= driver.findElement(By.name("password"));
 			pwd.sendKeys("1234567");
         // Click button sign in
 		       WebElement btglogin= driver.findElement(By.id("submit-login"));

 		       btglogin.click();
        btglogin.click();
       // Check login
 		       WebElement checkname=driver.findElement(By.xpath("//*[@id=\"_desktop_user_info\"]/div/a[2]/span"));
 		       if(checkname.getText().equals("Automation Testing"))
 		                    System.out.print("login success");
 		else
 			System.out.print("login fail");
This is where we have the complete code:
package hello;

import org.openqa.selenium.By;
import org.openqa.selenium.WebDriver;
import org.openqa.selenium.WebElement;
import org.openqa.selenium.chrome.ChromeDriver;
import org.openqa.selenium.chrome.ChromeOptions;

public class OpenBrower {
    WebDriver driver;

    public static void Open() throws InterruptedException {
       System.setProperty("webdriver.chrome.driver", "D:\\eclipse-workspace\\chromedriver-win64\\chromedriver.exe");
       ChromeOptions options = new ChromeOptions();
       options.addArguments("--incognito");
       WebDriver driver = new ChromeDriver(options);
       driver.get("http://teststore.automationtesting.co.uk/");
       Thread.sleep(1500);
       // Open Full size
 		       driver.manage().window().maximize();
      // go to signin page
 		         WebElement signin = driver.findElement(By.xpath("//*[@id=\"_desktop_user_info\"]/div/a/span"));
 			      signin.click();
      // Delay 0.5s loading
 		      Thread.sleep(500);
     // enter An account that has been registered on the website beforehand.
 		    WebElement acc= driver.findElement(By.name("email"));
 			 acc.sendKeys("autotest@gmail.com");
     // enter The password for the account registered on the website previously.
 		     WebElement pwd= driver.findElement(By.name("password"));
 			   pwd.sendKeys("1234567");
     // Click button sign in
 		WebElement btglogin= driver.findElement(By.id("submit-login"));
 		btglogin.click();
     // Check login
 		   WebElement checkname=driver.findElement(By.xpath("//*[@id=\"_desktop_user_info\"]/div/a[2]/span"));
 		   if(checkname.getText().equals("Automation Testing"))
 		   System.out.print("login success");
 		   else
 			  System.out.print("login fail");

       }

       public static void main(String[] args) throws InterruptedException {
              Open();
       }
}
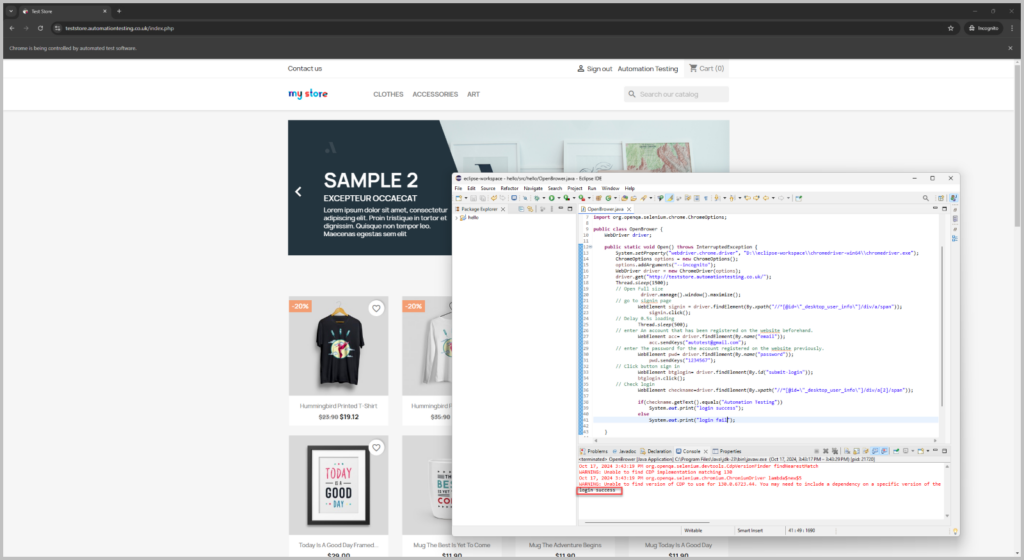
Now click [Run] to try it out. And we have the result.
6. Conclusion
You have now succeeded in creating the environment for Selenium tools. I have given you the 5 best steps to help you succeed as you’re setting up. However, this is just the start of the process, and you will have many questions. You could be asking yourself – I wonder how we can correctly fill in the username and password fields? Because we will use the syntax driver.findElement to locate the correct elements. Well, what is an Element, and how do we identify it? I hear you asking yourself. Keep reading the zen8labs blog to be able to find out all things Selenium and for more awesome content!
Viet-Anh Nguyen, Quality Assurance Engineer

