Before reading this article, you should already know how to use Retrofit at a basic level. You can refer to it here.
What are Interceptors?
Interceptors in Android are powerful tools that allow you to monitor, rewrite, and retry calls. They provide a flexible way to customize network behavior, add custom headers, log requests and responses, implement authentication mechanisms, and perform other network-related tasks.
Types of Interceptors:
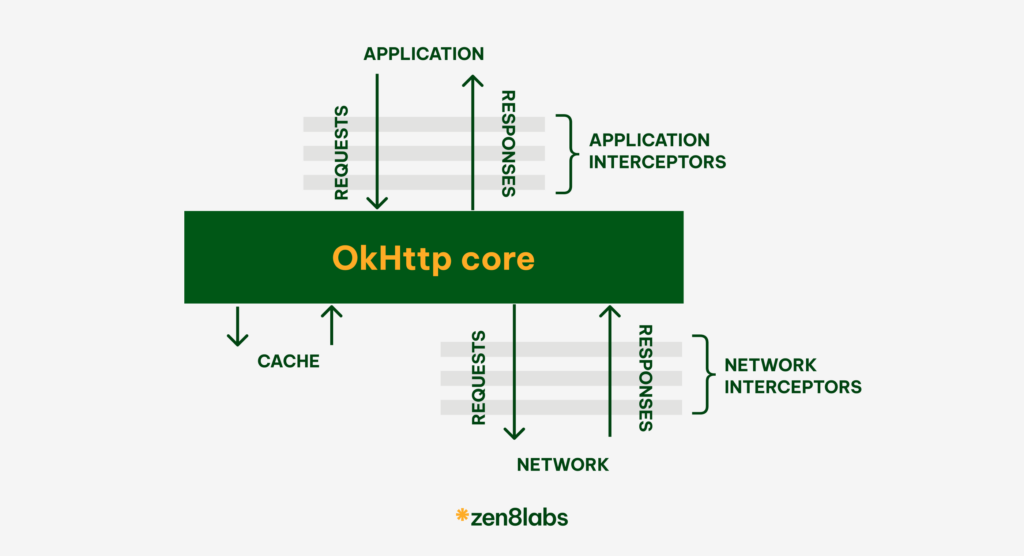
- Application Interceptors: These are interceptors that are added between the Application Code (our written code) and the OkHttp Core Library. These are the ones that we add using
addInterceptor(). - Network Interceptors: These are interceptors that are added between the OkHttp Core Library and the Server. These can be added to OkHttpClient using
addNetworkInterceptor().
How to add interceptors in OkHttpClient?
While building the OkHttpClient object, we can add the interceptor as below:
func httClient(): OkHttpClient {
    val builder = OkHttpClient().newBuilder().addInterceptor(MyInterceptor())
    return builder.build()
}
Here, in addInterceptor, we pass the interceptor that we have created. Now, let’s see how to create the Interceptor.
Creating the Interceptor
To create the interceptor, we need to create a class by implementing the Interceptor interface as below:
Here, in the intercept(), we can perform any action which we want inside it. And to use the interceptor, we can use as below:
class MyInterceptor : Interceptor {
    override fun intercept(chain: Interceptor.Chain): Response {
        /**
         * Our API call will be intercepted here
         */
    }
}
We can add the MyInterceptor in addInterceptor().
Now, let’s discuss more real use cases where we can use the Interceptors
A call to chain.proceed(request) is a critical part of every interceptor implementation. This seemingly simple method is where all the HTTP work happens—it’s where the request is initiated, and a response is retrieved to fulfill that request.
Once you have defined the interceptor interface as shown above, you can implement it with the OkHttp Client as demonstrated below. Now, you should register it with the Retrofit.Builder, so that the OkHttp Client will be used for all requests, and your interceptor will be invoked and take effect.
Adding the Header like Access Token centrally
Let’s say that we must make the API calls, and we must add the Authorization Header into all the API calls.
class AuthTokenInterceptor : Interceptor {
    override func intercept(chain: Interceptor.Chain): Response {
        val originalRequest = chain.request()
        val requestBuilder = originalRequest.newBuilder()
            .header("Authorization", "Token")
        val request = requestBuilder.build()
        return chain.processed(request)
    }
}
This is how we can centralize the Header which is common in all the API Calls. Now to use it in the OkHttpClient, we will do as below: .addInterceptor(AuthTokenInterceptor())
Refreshing the Access Token at Single Place
Let us say we have a use-case that when we get a 401 error in the Error Interceptor, and we need to refresh the auth token as we have an Unauthorized error. We can do that using the below:
override func MyIntercept(chain: Interceptor.Chain): Response {
    val accessToken = // our access token
    val request = chain.request().newBuilder()
        .addHeader("Authorization", accessToken)
        .build()
    val response = chain.processed(request)
    if (response.code() == 401) {
        val newToken: String = // fetch from another source
        if (newToken != null) {
            val newRequest = chain.request().newBuilder()
                .addHeader("Authorization", newToken)
                .build()
            return chain.processed(newRequest)
        }
    }
    return response
}
Conclusion
The examples above demonstrate practical use cases where we can leverage interceptors in our Android applications. Interceptors offer a wide range of possibilities, from modifying requests and responses to adding custom logic for logging, authentication, or caching.
At zen8labs, we also like to offer wide and creative approaches, if you want to see this in action, then get in contact with us here! Let’s start making the most out of this and all the powerful tools at our disposal!
Tien Tran – Mobile Engineer