You might already be familiar with property wrappers in Swift. Nowadays, they’re everywhere, especially in SwiftUI, where we commonly use wrappers such as @State, @StateObject, @ObservedObject, @Binding, @Published, @AppStorage, and @Environment… These wrappers have become an essential part in iOS development. At my company – zen8labs, we have also developed many custom property wrappers to support the daily work of our iOS developers
However, behind that simple and elegant @ symbol, there’s a lot happening. The Swift compiler hides much of the complexity to let us focus on implementing our business logic, but this abstraction can lead to confusion when we first encounter it.
In this post, we’ll take a deep dive into how the Swift compiler manages property wrappers at compile-time, focusing on the code generation that happens under the hood, so it requires a basic understanding of Swift. If you’re new to Swift, I suggest learning the basics first before moving forward
What Happens at Compile-Time?
Before diving deeper, Let’s take a look in this simple property wrapper that clamps an integer between a minValue and maxValue:
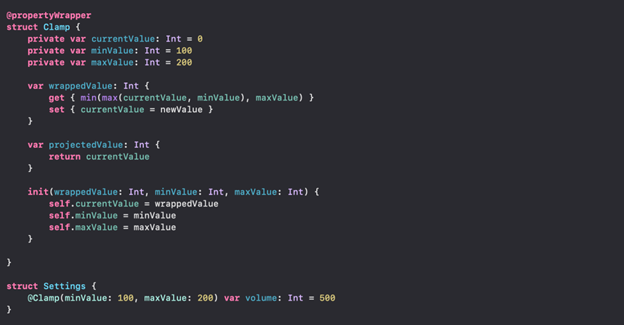
The Clamp wrapper ensures that the value of volume will always remain between 100 and 200. If an attempt is made to set volume to a value outside this range, it will be clamped to fit within the bounds.
Nothing is too complicated, right? The question is: what happens behind the @Clamp? And how does it ensure that our volume property is always clamped between 100 and 200?
At compile-time, the Swift compiler transforms the property marked with @Clamp into a more complex structure. It creates a private backing property and generates getter and setter methods for the wrapped property.
Settings
For the Settings struct above, the compiler will synthesize code that looks something like this:

Here, the @Clamp attribute tells the compiler to create a backing property (_volume) that stores the Clamp instance, which contains the logic to clamp the value. The volume property is then turned into a computed property that accesses and modifies the wrappedValue of the Clamp instance.
You can check this behavior by trying to add a _volume property to the Settings struct. The Swift compiler will prompt an error, telling you that you’re redeclaring a property like this:

But wait, it’s quite easy to understand how the Swift compiler generates the volume and $volume computed properties. However, since our Clamp can have multiple constructors, how does the Swift compiler know which constructor to use when creating _volume?
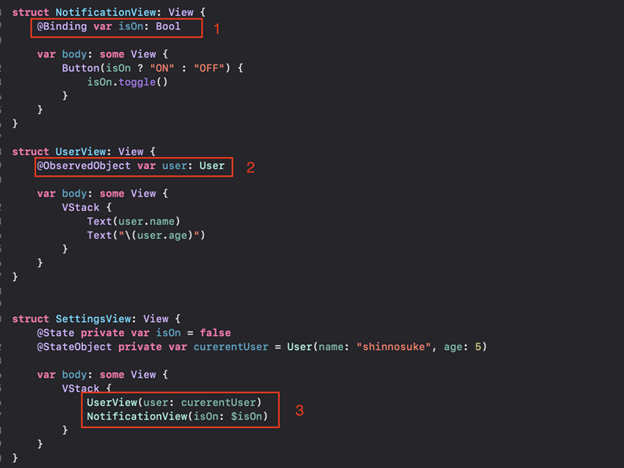
On the other hand, when working with SwiftUI, you might be confused about initializing a view that has a property declared as a property wrapper, such as:
Property Wrapper
Let’s focus on the isOn and user properties of NotificationView and UserView. Both are property wrappers. However, when we create an instance of UserView, we have to pass an instance of type User, while for NotificationView, we need to pass an instance of the Binding property wrapper itself, not a boolean value. Why is that?
That’s because there are some rules about code generation that have been defined in the proposal when implementing property wrappers – Refer to SE-0258. These rules not only affect the code generation for properties but also the memberwise initializer of the type.
According to that proposal, the stored property of a property wrapper can be initialized in one of three ways:
1. Via a value of the original property’s type
Let’s take this example of the original property’s type:

In this example, we provide an integer value to initialize the stored property for the property wrapper (e.g., _volume1, _volume2, _volume3 below). This requires the property wrapper type to have an initializer where the first argument is named wrappedValue.
The code above will be generated into something like:
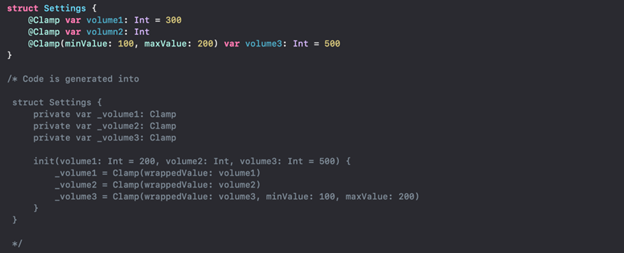
And our Clamp property wrapper must provide two different initializers like this:
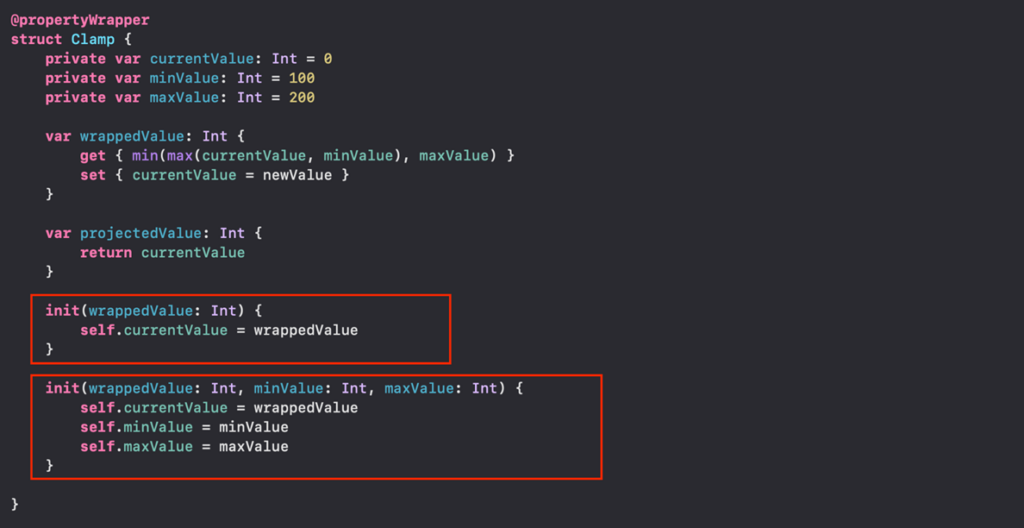
If the Clamp property wrapper doesn’t provide initializers with wrappedValue arguments, the Swift compiler will throw an error like this:
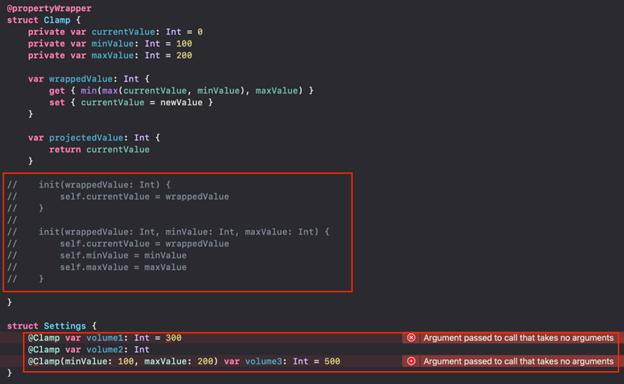
To make this easier to remember, you can think of it as the Swift compiler always taking the default value we declare and passing it into the wrappedValue argument in the property wrapper’s initializers.
There’s a slight difference in the case of declaring volume3 compared to volume2. If we remove the default value for volume3, an error will be prompted like this:

In the case of volume2, the Swift compiler already has enough context to infer that it needs to use the init(wrappedValue:) initializer to create the _volume2 stored property. But for volume3, the Clamp property wrapper might potentially have another constructor, such as init(minValue:maxValue:), which doesn’t have a wrappedValue parameter. As a result, the Swift compiler can’t automatically decide which constructor to use in that case.
When there are multiple composed property wrappers, all of them must provide an init(wrappedValue:) initializer, and the resulting initialization will wrap each level of calls. For example:

2. Via a value of the property wrapper type itself, like in our NotificationView
Looking at the example:
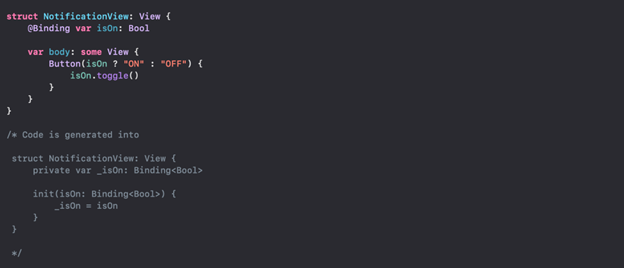
In this case, the memberwise initializer of NotificationView will be init(isOn: Binding<Bool>), not init(isOn: Bool). This is because the Binding property wrapper does not have an init(wrappedValue:) initializer, so we must provide the value for the property wrapper as a normal property.
3. Implicitly
Implicitly is when no value of the property wrapper type itself is provided and the property wrapper type has a no-parameter initializer init(), the init() will be invoked to initialize the stored property. For example:

I know this is a simple and perhaps useless example, but I wanted to keep it straightforward so you can focus on the generation rule itself.
Key points
To summarize, there are 3 things you have to remember:
- If the property wrapper has an init(wrappedValue:) initializer, the Swift compiler will use a value of the original property’s type to initialize the property wrapper.
- If not, the Swift compiler will use a value of the property wrapper type itself.
- If no value is provided for the property wrapper, the Swift compiler will automatically invoke init() (if available).
Conclusion
Property wrappers in Swift provide a powerful and reusable way to encapsulate property logic. The compiler plays a critical role in synthesizing the necessary code for the backing store, initializers, and projected values.
By understanding how the Swift compiler handles property wrappers behind the scenes, you can make better use of these features in your projects. Whether you’re clamping numbers or using property wrappers in SwiftUI for state management, knowing the internal workings can help you write more efficient and expressive Swift code. If you want to find out more insightful things then look at the zen8labs blog – inspire yourself to create something awesome!
Toan Nguyen – Head of mobile
