At zen8labs, as iOS developers, we can sometimes encounter the need to build complex features that can be difficult to manage and maintain over time. Swift packages offer a powerful solution to modularize code, making it easier to maintain, update, and reuse across projects. But, creating a Swift package is not enough, having a way to demonstrate its functionality is crucial. That is where adding a demo project comes in.
In this guide, I shall walk you through the process of adding a demo project to your existing Swift package. By the end, you’ll have a Swift package integrated with a working demo app that showcases your package’s capabilities in real-world scenarios.
Prerequisites
Before we start, let us make sure you have the following:
- Xcode installed (version 11 or later).
- Basic knowledge of Swift and Swift packages.
- An existing Swift package or a basic understanding of how to create one.
Step 1: Create your Swift package
If you don’t have a Swift package created already, follow these simple steps to create one:
1. Create a new directory for your package and navigate to it:
mkdir ImageCropper
cd ImageCropper
2. Initialize the Swift package:
swift package init --type libraryThis will create a Swift package with a Sources and Tests folder structure.
3. Open the package in Xcode:
open Package.swiftXcode will open with your Swift package ready for development.
Step 2: Explore demo structures from other packages
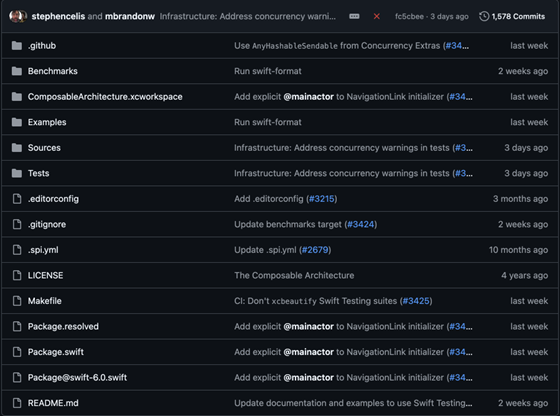
Before we create our demo app, let’s take a look at how popular packages like The Composable Architecture (TCA) structure their demo projects.
In TCA’s repository, you’ll find an Examples folder that contains simple demo projects showcasing various package functionalities.
Here’s what the TCA folder structure looks like:

Similarly, we’ll create a demo app in our ImageCropper package to showcase its functionality.
Step 3: Add an “Examples” folder and create a demo project
To follow best practices, let’s add an Examples folder to our Swift package that will house the demo project.
Create the “Examples” folder
In the root directory of your Swift package, create an Examples folder to keep your demo projects organized:
mkdir Examples
Add the demo project
- Open Xcode and create a new project: File > New > Project.
- Select App under iOS and click Next.
- Name the project ImageCropper-Demo-UIKit and make sure the location is set to the Examples folder.
- Uncheck the Include Unit Tests option as we’re focusing on the demo functionality.
- Click Finish to create the project.
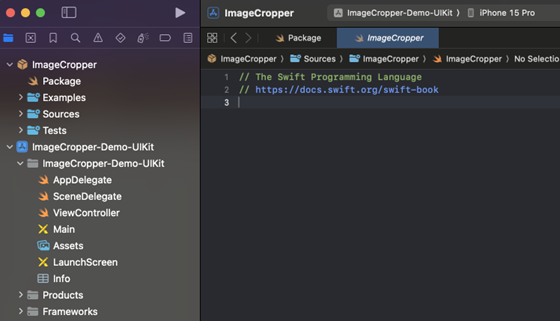
Your folder structure should now look like this:

Step 4: Add the package to the demo project
Let’s link the ImageCropper package to the ImageCropper-Demo-UIKit project so we can use it in our demo app.
- In Xcode, select the ImageCropper-Demo-UIKit project.
- Go to the General tab of your project’s target.
- Scroll down to Frameworks, Libraries, and Embedded Content.
- Click the + button and search for ImageCropper.
- Add the ImageCropper package as a dependency.
This will allow the demo project to use the ImageCropper package in the app.
Step 5: Add the demo to your Swift package workspace
So, how do we add the demo project? To keep everything organized and to make it easier to manage both the package and the demo project, let’s create a workspace. A workspace allows you to manage multiple Xcode projects in one place, which is perfect for our purpose.
Create a workspace
Let’s start by creating a workspace that will include both your Swift package and the demo project.
- Open Xcode.
- From the menu, select File > New > Workspace.
- Name the workspace ImageCropper.
- Choose a location to save the workspace. It’s usually a good idea to save it in the root directory of your Swift package.
Add the Swift package and demo project to the workspace
- In Xcode, select File > Add Files to “
ImageCropper-Demo-UIKit”.
- Add the ImageCropper package and ImageCropper-Demo-UIKit project to the workspace.
Now, both the package and the demo project will be in the same workspace, making it easier to manage and test.
Hide the “Examples” folder from the package
Once you’ve added the Examples folder for your demo project, you might notice that the Examples folder is being included as part of your Swift package. This can clutter your package structure and confuse its purpose. To resolve this, we’ll remove the Examples folder reference from the package while keeping it accessible in the workspace.
Here’s what the workspace looks like initially, with the Examples folder visible within the package structure:

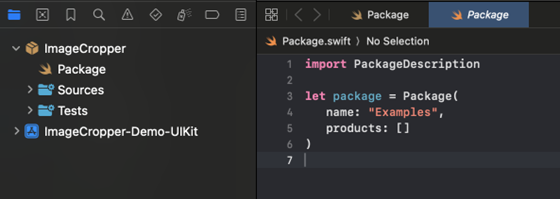
To hide the Examples folder from the package: Create a new Package.swift inside the Examples folder with the following content:
import PackageDescription

let package = Package(
   name: "Examples",
   products: []
)
This will make Xcode treat the Examples folder as its own isolated package without any products or targets, which prevents it from being displayed in the main package.
Close and reopen the workspace. You will now see that the Examples folder has been hidden from the package structure.

Step 6: Build and run the demo
With the demo project and the package successfully integrated into the workspace, it’s time to test your Swift package in action.
To begin, I created an ImageCropperView component within my ImageCropper package, which I’ve now imported into the ImageCropper-Demo-UIKit project.
Next steps
- Select the ImageCropper-Demo-UIKit scheme from the scheme selector in Xcode.
- Run the demo app on your desired simulator or physical device.
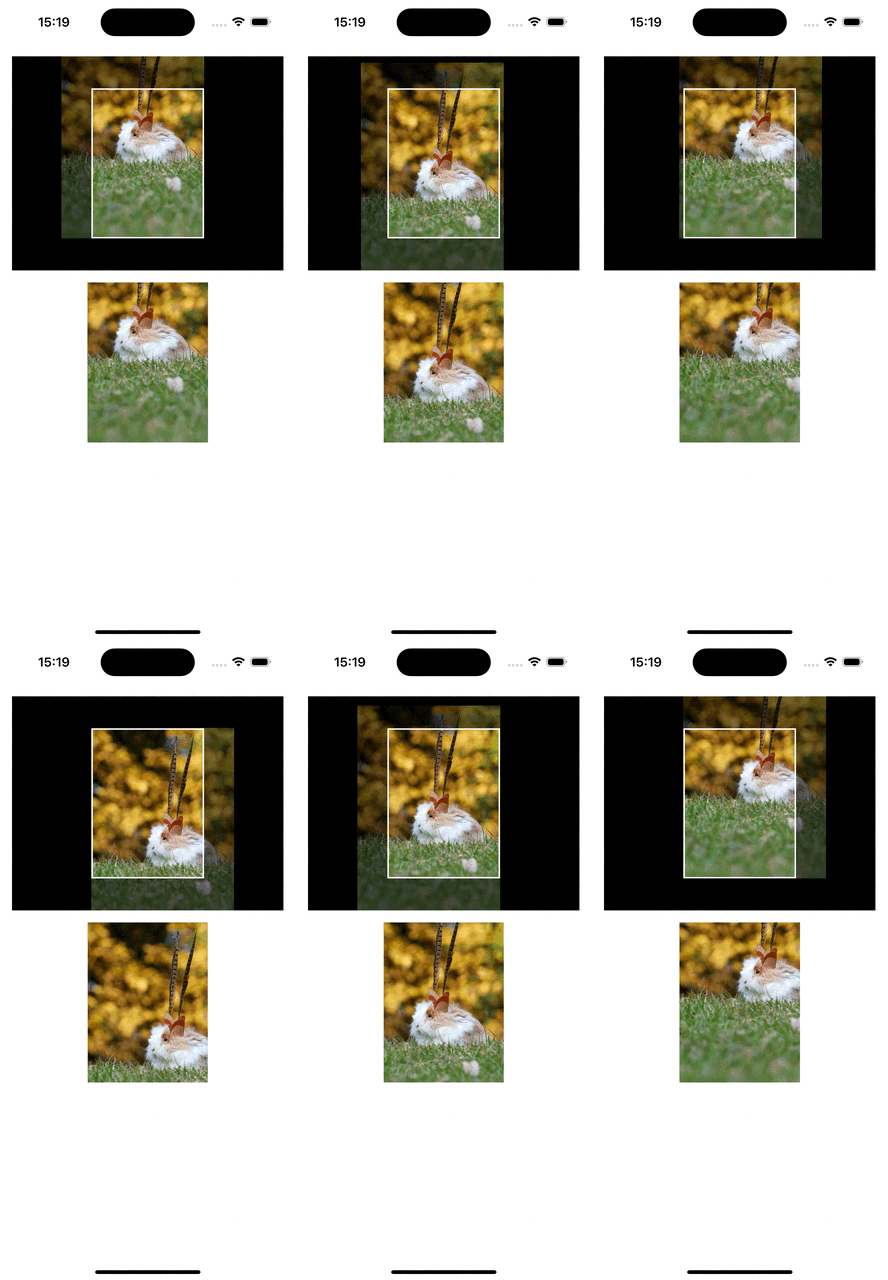
- Test the functionality of your ImageCropper package within the demo app. Here’s a preview of the ImageCropperView component successfully integrated into the demo project:
I create ImageCropperView in my package and import to demo project

After running the demo, you should be able to interact with the ImageCropper package and see it in action, like so:

Everything is working as expected, and the demo app provides a smooth way to test and showcase the functionality of the package.
Conclusion
Adding a demo project to your Swift package makes it easier to test, showcase, and maintain the functionality of the package in a real-world app environment. By following this guide, you are now able to run a demo project which can be integrated into your Swift package, allowing for better testing and demonstration of the features. However, if your project requires that special touch then speak to us at zen8labs, we have the skills to achieve your goal!
Quan Nguyen, Solutions Architect


